
Add a SSD to a 2010 27″ iMac: Part 1, You Can Do It!
The El Capitan Nightmare
A few weeks ago I found myself pretty stoked because Apple’s new OS, El Capitan, had been released. I rushed home from work one day and began the install on my 2010 27-inch iMac. What followed was not pretty. My iMac’s original HDD wasn’t having it. The progress bar would stay stuck at 66% for hours upon hours. I finally decided to revert back to Yosemite using a time machine back-up. That didn’t work either. Ultimately I completely wiped the original HDD and El Capitan finally installed. However, my computer was running very, very slow.
My only conclusion was that 5 year old drive is on it’s last legs so I began checking into other solutions. I was very happy with what I found. It seems that quite a few people have successfully added a solid state drive to their old iMacs, breathing new life into them. My iMac specs are still pretty great: 2.8 GHz i5 quad-core with 16GB of RAM. Why throw that away when a new super quick solid state drive could potentially make the thing lightning fast again? Keep reading to check out my progress so far on how to add a SSD to a 2010 27″ iMac.
Research: How to Add a SSD
So I began further research to see just how involved the process is. There are already a number of well written tutorials about how to crack the iMac beast apart and get to the inside guts. Reading through these I realized there are a number of options when it comes to mounting the SSD inside of the iMac. OWC sells a kit that includes the tools necessary to break into an iMac as well as several cables that can be used to hook into the existing ports while leaving the original HDD in tact. Another option is to remove the original HDD and straight up replace it with a new SSD. The third option I came across is to purchase a caddy allowing you to mount the SSD where the current optical drive is.
I decided against purchasing a drive from OWC based on some recent Yelp reviews I discovered. The kits and drives they sell look pretty legit, but I didn’t want to risk a drive failing after a short time. Ultimately I went with a Samsung 850 EVO 500GB which was very reasonably priced on Amazon. It’s well reviewed and comes with a solid warranty.
Next I needed to decide where to mount the SSD so I could purchase the rest of the supplies I needed. Installing the drive under the logic board looked a little more difficult to me based on the tutorials I had read, so I decided against that option. I want to leave the original HDD in the machine (even though it’s failing) so I don’t have to mess with installing extra software to control the fan speed. The Apple fan sensor doesn’t seem to like third party drives and I’ve read the fan speed will run at full blown airplane take off mode once the third party drive is in there without extra software installed to control the fan. Yikes. I chose to mount the drive in the optical bay. This way I won’t have to mess with splitter cables, I won’t have to touch the original HDD, and I honestly can’t remember the last time I popped a CD into my machine.
Machine Specs
Consider the specs of your machine before deciding where to install a new SSD. The 2010 iMac is SATA II everywhere, so it’s a matter of preference where the drive gets mounted. However, if your machine only offers SATA II in the optical bay but does offer SATA III in the HDD bay you will gain quite a performance boost by installing it where the original HDD is or using a splitter cable to hook up the SSD to the HDD ports. The Samsung SSD I bought supports SATA III but I will only gain SATA II speed since that’s all the 2010 iMac supports.
Where I’m at in the Process
I haven’t even cracked the iMac open yet. I purchased a handy USB to SSD cable that made it a snap to hook the drive up externally. I highly recommend installing the OS while the drive is hooked up externally. This way, if anything goes wrong and the drive doesn’t work, you aren’t stuck having to bust the iMac open again to get the drive out. Once it was hooked up externally, I erased the SSD drive with Disk Utility, did a fresh install of El Capitan (which only took around 30 minutes this time as opposed to the over a week long nightmare I had previously experienced), changed the startup drive to the SSD in System Preferences, and did a restart. I wanted to keep things fresh, so rather than do a restore from my time machine back-up to the new drive I chose to manually drag files over that I wanted to keep.

I was pleasantly surprised at how blazing fast my computer is now, just with the SSD hooked up externally. I’ve already copied all of my music files etc. to the drive and it’s not quite half full. Using Creative Cloud I installed Photoshop, InDesign, and Illustrator and all of these run faster than they ever have before on this machine.
Supply List
Following is the supply list I’ve compiled so far to add a SSD to an iMac:
- The SSD, Samsung 850 EVO 500GB.
- USB 3.0 to SSD cable so you can hook the SSD up externally. Note that this will also work with USB 2.0.
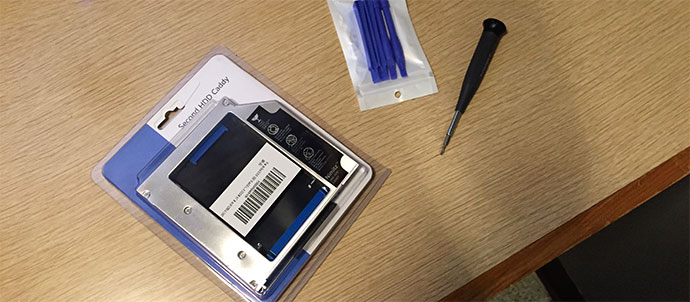
- Hard Drive Caddy/Enclosure for mounting the SSD in the optical bay.
- A pretty tough looking suction cup deal with a manhandle in the middle. Your buddies will be impressed by your toughness when they see this thing. It’s strong enough to suction onto big glass windows and also strong enough to suction onto and safely remove the glass from the front of your iMac. (See Part 2 for this step)
- Some plastic spudgers to help with prying things apart whilst disassembling the iMac. (Again, more on this in Part 2)
I am excited to carry on with this process. Visit the blog next month to read Part 2. I’ll fill you in on any challenges I face as well as anything that goes wrong. I am optimistic about breathing new life into an old machine and making it last another few years.